
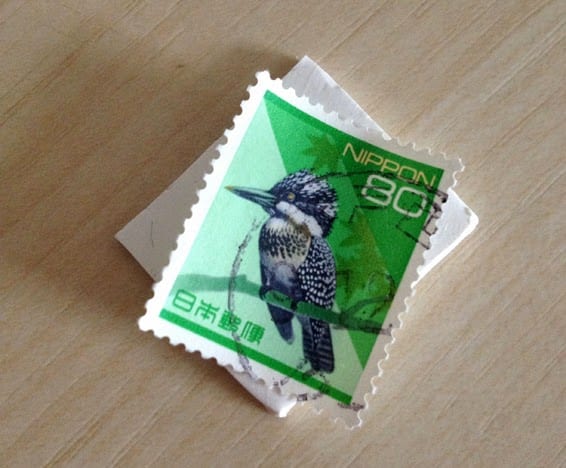
Being obsessed with post, I’ve managed to collect quite a lot of amazing stamps over the years. Some I’ve picked up locally, some from markets in Paris, and most recently, a lovely little collection were sent to me from far far away. But it’s so sad to keep them hidden away in a little box, so today I decided to create a little diy that turns them into jewellery. The perfect accessories for my trip to the post office!

As I’m using sent stamps (used ones), I’m going to need to get them off the paper. To do this, fill a bow with some lukewarm water and submerge the stamp. After about 5-10 mins you’ll find it’s peeled off, clean and easy! Some of the more modern stamps that come ready to stick can take a little longer. Try gently coaxing the stamp off the paper, but if it’s resisting give it another few minutes. It’ll come, you just have to be patient.
Once it’s clean off, use some kitchen roll to gently blot off excess water then leave it for 20-30 mins to dry out completely.

I’m going to turn my stamps into brooches, but this method is perfect for creating earrings, a necklace or even a charm for your bracelet.
To give the stamp a sturdy backing, I’ve used some oven bake clay (Sculpey, but Fimo is also great). Alternatively you could use a Scrabble piece or thick acetate, but I find this is the best way to create a backing that’s the right size and a good thickness.
Simply roll it out evenly till it’s a few millimetres thick, place the stamp down and cut around it using a sharp knife….
Perfect!
If you’re planning to turn your stamp into a necklace, remember to add a hole into the two parts now.
Next, pop it in the oven and bake it for the recommended period of time (I think mine was 20 mins at 130 degrees celsius) Remember to give it 10 minutes to cool before you continue or risk burnt fingers!

Looking cute and ready to go!

Attach your stamp to the backing using a thin layer of white glue (I used Mod Podge) and make sure to press it down so there’s no bubbles mis-shaping it.

Once it’s dried, add a couple of layers of glue over the top of the stamp to protect it from the elements. Remember to do all the sides too! Sealing it is important to make sure it doesn’t get damaged when you’re wearing it.
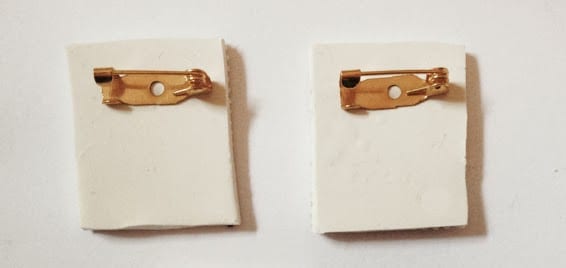
Once the white glue has all dried and gone clear, super glue on a brooch backing and leave it to harden…. this is the hardest part because you’ll be too excited to wait!
*Ta*Da*
Aren’t these the cutest accessories you’ve ever seen? And no two will ever be the same – that’s the beauty of used stamps, they all have their own marking from being franked. I wonder if I covered my whole coat in these and jumped in the back of a post van they’d take me on holiday?… A girl can dream!!
I hope you have fun up-cycling your stamps; another great reason to look forward to receiving more mail 🙂 Remember to ask for stamps when you’re posting packages to your favourite people – I’d hate to see the whole world turn into a barcode :O
Happy Making!
xox


They look so cute !
Eb x
Thefearlessfox.blogspot.co.uk
Thanks so much Eb 😀 I’m pretty delighted right now!
Awesome DIY! I love recycling/upcycling. =0)
Thanks Kim 😀
I love stamps, you know I do. My collection is growing, slowly. I used to collect them, following my mum’s old collection, but I got fed up with buying packs and them all being duplicates. Now I tend to buy stamp sets straight from Royal Mail when they come out. New Zealand Post brought out two sets of Hobbit stamps with the movies, one set in 2012 and one in 2013. They’re all on ebay but I’ve been unable to afford them! But I love the UK currency ones, so when I saw this postcard on Etsy I had to buy it! https://www.etsy.com/uk/listing/176548707/ooak-custom-stampified-postal-patchwork
This tutorial is amazing, as ever, and so unique! Very Vivid 😀
Aww that’s so fun! I love that it’s rainbow :B
I think it’s lovely that you’re following on from your mum collection, that’s a nice thing to pass down if you ever have kiddy winks!
I saw some I Love Lucy stamps on ebay that I would totally love to add to my collection, but it’s so funny that they cost so much to post! Haha! There’s some cracking elvis ones out there too. I’m hoping to stumble across more at markets rather than ordering online – much more fun 🙂
Great!!!! Good ideas!
Thank you Serena 😀
I love this idea and definitely plan on giving it a go! I like to up-cycle and am a bit of a stamp hoarder. My stamp collection is usually kept in a little draw, never thought of wearing one (or more) until now. Thanks, such a great post.
Amazing 😀 I’m so glad to hear you found it inspiring! It’s nice to find a new purpose for them, it’s such a shame to keep them tucked away. I have quite a few that are begging to have a new life! hee hee
Have fun making them! x
Such a cute DIY! I like to make cards out of old stamps too 🙂
thanks Claire! Stamp cards sound adorable 😀
Thank you for sharing this tutorial with us. Another good way to remove stamps from paper without damaging them is to use steam, that is what we did in my stamp collecting club in elementary school.
oh i just love these!!! SO cute! I’m keeping an eye out for some stamps from now on and definitely giving this a go. Thanks 🙂 x love from ST Helens, North West x x